Sturgeon

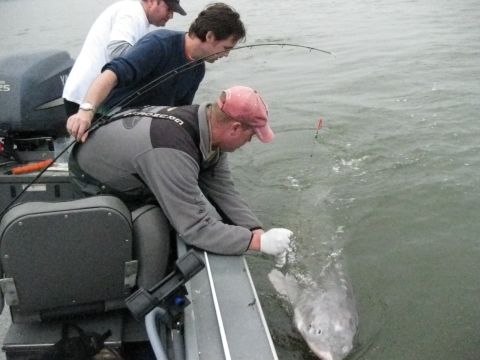
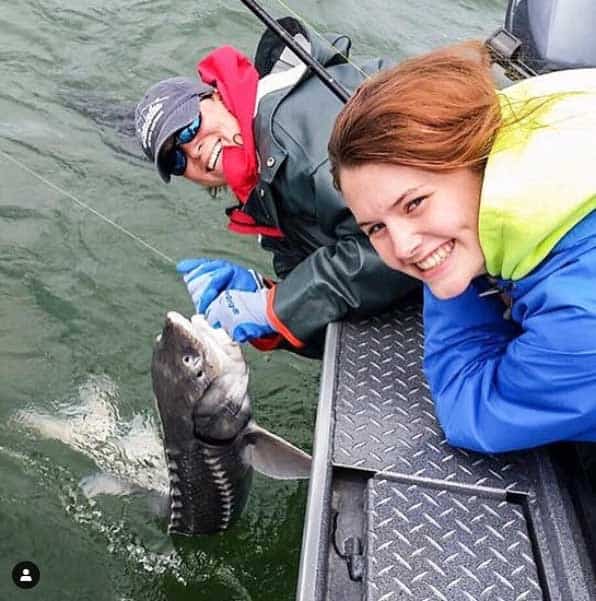
How to catch Sturgeon 101

With summer on the lower Columbia River quickly approaching,  I have been hearing lots of stories of the have’s, and have-not’s of sturgeon fishing.  Some boats are already reporting 30+ fish days and others are reporting how some boats only touched one fish all day long. Having spent the last nine June and July’s in the Columbia River estuary chasing these dinosaurs, I want to share some ideas of where to find sturgeon in this vast area of water and how not to upset other sturgeon anglers in the process.

Rule 1Move your boat with the tide. Sturgeon are lazy; they flush back and fourth on the tide, scouring the bottom of the river for food. This is where the rule of “edges and ledges” come in. Find those natural funneling ditches & edges and you will find fish. I tend to move down towards the bridge in search of fish on the outgo, then move back up towards Tongue Point on the incoming, anchoring in promising spots along the way.

Fishing for Columbia River Sturgeon

Rule 2Your goal is to intercept the fish as they flush back and forth. I can see “lines” of sturgeon come through an area on my fish finder. I will fish water from three feet deep to 40 feet deep, depending on where I am seeing fish. If you don’t have side scan sonar, you will need to vary your depth to find the fish. Beginning of the incoming tide, I tend to find them in deeper water and/or the upstream side of sand bars, and then shallower as we approach max flood.  After the tide changes I start shallower, then work out deeper.  Don’t be afraid of shallow water, but also know which way the tide is going. More than once in the summer I have seen the tide drop out from underneath boats, leaving them high & dry until the next tide change.

Rule 3 Set the timer. Sturgeon fishing can be a rigorous sport if you are searching for fish. Max time I will spend in any one spot is 30 minutes without a bite. Once the time limit has expired, I start working my pattern searching for sturgeon in a different depth of water or near different structure.

Rule 4Change your bait often. Again, I start rotating baits about every 30 minutes if we aren’t getting bit. If the belly of your anchovy is blown out, change it. All of the rods got bit but one didn’t? Change the bait on that rod, there is a reason it didn’t get bit. No sturgeon has ever complained about the bait being too fresh. I plan for 1 pound of anchovy per person, then one extra pound for the boat. You never know when you will be catching allot more sturgeon than usual or having bad issues with trash fish eating your bait. Don’t be cheap, take enough bait and then some, you’ve gone through allot of effort to go fishing, don’t cut yourself short on bait.

Rule 5Don’t “CORK” someone. I was told that “corking” is an old gillnetter’s term used to describe a fisherman who sets up above another fisherman and intercepts that boats fish as they flush back by on the tide. I could care less if someone anchors below me, just don’t anchor above me. It seems counter intuitive at first, but going back to rule #1 & #2, those fish are flushing through on the tide and tend to come through in lines. Be courteous, give other anglers room.

Rule 6 – The exception of rule 5; you can anchor below other boats, but not too close. The reason is this … if you’re below me and I hook a hot oversize sturgeon (6-11 foot fish), she will undoubtedly get into your anchor rope and cause all sorts of chaos.

The Columbia River estuary isn’t the Willamette or the mouth of the Cowlitz, there is no need to hog line down here. We often have to leave our anchor to chase big fish. Dropping off anchor just to have to try to maneuver past another boat directly below us isn’t much fun. 300 pound fish go where they want and often that means they will wipe out all of your lines and wrap up in your anchor rope. Do everyone a favor and be courteous by allowing extra space between your boat and others.

Lacey DeWeert – Total Fisherman

360-560-5992 – lacey@totalfisherman.com

How To Fillet A Sturgeon

Check out our Astoria Fishing Charters and Washington Halibut Charters

Filleting sturgeon is definitely not as easy as filleting salmon but once you watch this video you’re going to be well on you’re way to becoming a pro!

If you’re interested in purchasing the same high quality knives used in the video, scroll down and visit our affiliate partners.


It’s important to have sharp knifes and to keep them sharp when you’re filleting fish of this size.  Having the correct knife for each task keeps the knives sharper longer and makes processing the fish faster because you have the correct tools for the job!
The 12″ Slicing Knife is what we used to take the skin off of the meat.
The 8″ Wavy Edge Bread Knife is what was used to remove the diamonds/spikes from the outside of the fish.
The 10″ Butcher Knife was used for miscellaneous duty throughout the video.
The 9″ flexible fillet knife is what was used for removing the ribs and trim work.
The Victorinox/Forschner honing steel you see in the video is the best money can buy, you will be amazed at the edge this steel can put on a knife and keep on a knife.  If your knives are very dull you may even consider buying a diamond steel for heavy duty sharpening and then the honing steel for getting and maintaining that razors edge.
Learning how to fillet a large sturgeon like a pro takes quite a bit of practice but if you follow these steps and take your time you will find that the end result is a great looking fillet with little to no waste.
Andy:  The first thing that we’re going to do is remove the scutes on the sides and on the back. We cut them off the back because it  actually exposes the line that you cut down and this last one on the head is kind of tough to get off, you’re going to have to put a little pressure on it. Remove the fins so we don’t have to cut around them.
I’m putting quite a bit of pressure on this knife to get these diamonds off, but if you hold your knife flat you’re not going to cut into the fish. If you hold your knife flat, and scrape, they’ll come right off without cutting in.
Kevin: Andy, why do you cut the scutes off?
Andy:  The reason you cut them off is because when you go to skin it, the scutes will actually push down into the meat when you lay the meat  onto the table and then the knife will catch on every one as you’re skinning and you’ll end up cutting through the skin and that really puts an  extra twist on your skinning.
So that’s how we prepare it.
I want to show you this line here that we’re going to cut down. Right here, you see this?  Where you’ve got white then yellow then white, that’s  the line we cut down and I start right here at the dorsal fin, and I’m only going to in about a quarter of an inch just to get my cut started and I’m going to cut down both sides on that line. And again, just going about a quarter of an inch. Then I’m going to come back through and I’m  straight down with the knife, perfectly straight down and absolutely straight.
Once you get down there about half an inch you can actually angle that knife a little bit against that center to make sure that you keep going  straight down.
And eventually what you do is you start hitting the top of the ribs. You can feel the knife going “tap tap” on the top of the ribs on both sides.
If you open that up you can actually see that the ribs start to go out.  So you get it to that point and then with just a little extra pressure  you go right through the ribcage on each side and you end up like this when you’re opening this thing up and you’ve separated the ribs on both  sides.
At this point I turn it over, cut around the gill plate, poke my knife through and come right down to the tail and cut that off. Going through  the ribs, it lays open like that. Then you come back through with the knife and just cut through that little stomach liner.If you hold this thing up to the light you can actually see the white line there, that’s the very dead center of the belly and it’s paper thin  and that will just cut right off like that and there’s your one side.
When you flip it over this side is already started, there’s no guess work or flopping around. This is actually completely separated here, you  just put your knife in and go right down the back there. You flip that side over then again just cut through that stomach liner and your fillet  is off. You didn’t cut the head off, you didn’t have to gut it, everything (head, guts, backbone, etc) is still intact.
Rinse the table.
Ok, so then you flip this thing over and right where the fin is there, where the anal is, you just cut that off and you cut right down the edge of those diamonds and you cut that little belly strip off. There’s nothing there. By the time you skin each side you’re not wasting any meat,  there’s just nothing there to save. The same thing here you just cut right down that diamond line, right past that fin and get rid of all that.
To skin it, we’re just going to go through it here like you would any other fish and remove the skin. Now there’s some tricks to it. You want to put some pressure on this. I’m pulling on this tail and I’m putting a lot of pressure on it. Almost as much pressure pulling on the skin as  pushing on the knife and just kind of walk it through and it’ll come right off of there.
The way I like to do it is I leave the ribcage on this side because it supports this meat while you’re trimming the red meat. If you cut the ribs off first, this will concave and it makes it very hard to trim off.
What I’m going to do is pull on this, kind of straighten it out, but putting a little pressure on there. I’m using a very flexible knife that  bends and where this bends at the bottom of the curve is where it’s going to cut and I’m going to push down on it. Again I’m going to keep the  knife very flat. If you get it at an angle you’re going to cut into the meat and if you get it up you’re going to pop it up though, but if you  keep it very flat and just give it little tiny see saw action and then control where the deepest part of the bend is, then you can walk that knife right down it and take that whole thing off, that little paper thin strip and it just goes from red to white on a paper thin strip. And I’m going to follow that edge and I’m just going to keep cutting down.
Kevin: Andy, why do you take the fat off?
Andy:  The fat has a very strong fishy taste to it and it’s just overpowering and will just make it taste fishy. If you get this red off,  and you don’t have to get every tiny speck off, but if you get the bulk of it off  it improves the quality of the fish a 1000 times.
Then I also cut from the tail to the head. There is a bit of a grain to this meat and it seems to come off smoother and nicer if you’re going  from tail to head, but the last little bit of the tail here, you have to spin it around and get that stuff. The hardest part is the tip of the  tail, that red kind of ingrains pretty deep in there.
Now, we’re going to wedge this center line out and I’m going to keep my knife flat. You’re not going to cut into it like this because you’ll cut  into it too deep. My handle is actually going to ride against the skin and I’m going to cut in there at about a 45 and I’m just going to walk it  right down like that and I’m going to turn it over on this side and do the same thing.
And then sometimes you’ve got to cut through there a second time and then you wedge that out. You don’t want to cut too deep, you can always go  back through and hit it a second time if you don’t cut deep enough but you don’t want to cut too deep on your first pass and end up wasting a lot of your good quality meat. So at this point I’m going to flip it over and take these ribs off. I’m going to switch places because I can only cut  one way.
Again, the knife can only cut one way. I’m going the lay knife as flat as I can and I’m just going catch right under the rib and just pull it  along the rib and just make a couple of lengthy cuts down here, and I’m actually putting a lot of pressure on that knife and the more pressure I  put on it the shallower it cuts. If you don’t put enough pressure it it’ll either walk into the meat or pop up through, but the more pressure you put on it, it’ll actually stay flat. And that’s the ribs and then again the same thing here – I’m just going to walk that down and trim that off.
If it’s red, this is the front shoulder where that main pectoral fin is and you want to cut that little chunk of red off. Trim up any bits of  remaining stomach liners. This is the fletching of off the dorsal fine but you end up with a nice fillet here.
If you want to hit any last little spots like you’ve got a little spot like this, the trick is to make that spot the highest spot so I’m going to put the fish in my hand and I’m going to curl it up and make that spot high and then I’m just going to shave that right of without gauging or  taking anything off. I’m going to raise that, make that the highest spot in the meat and just peel it just like you’re peeling a potato.
That’s a pretty clean piece of meat and that’s how you fillet a sturgeon.

Top 5 Sturgeon Fishing Tips

Check out our Astoria Fishing Charters and Washington Halibut Charters


Sturgeon fishing tips

Sturgeon fishing tips and techniques are fundamental for consistently catching high numbers of sturgeon and big sturgeon.

The following 5 sturgeon fishing tips are techniques that I employ on a daily basis as a sturgeon fishing guide and they have put a lot of sturgeon in the boat over the years!

1. Fish where the sturgeon are.

Fishing where the sturgeon are may seem like an obvious statement, yet I can’t tell you how many times I see anglers fishing in areas that just don’t hold sturgeon or aren’t holding sturgeon at that particular time.  Sturgeon are a very mobile fish, they move on the tides, they move to follow food, and they move to stay comfortable. These fish move a lot and they aren’t always moving where you expect them to be moving!

One of the best tools that an angler can have when pursuing sturgeon is a very good high end digital fish finder, such as the new Lowrance HDS series or a digital Humminbird or Furuno.  It not only pays to have one of these units, but it pays even higher dividends if you really know how to use it. Read the manual, go out on the water and practice with it (not while fishing), and then read the manual again. These units are complex but they aren’t impossible to use, and a little bit of practice and reading goes a long ways!


Another tried and true approach to finding sturgeon, especially sturgeon that are willing to bite, is fishing in water that has adequate flow. As a general rule of thumb, big sturgeon are found in big fast-moving water. If you go to Bonneville your going to find that the big fish are in the fast water and the little fish are in the slower moving side areas and eddies.  If your on the Willamette fish closer to the center of the river, the middle of the river has more flow.  Big sturgeon like to eat big food and it takes a pretty good amount of current to move big food!

2. Keep your sturgeon bait fresh.

Keeping your sturgeon bait fresh … again pretty simple stuff, but it doesn’t matter if I’m salmon fishing, steelhead fishing, or sturgeon fishing, I see anglers trying to use their bait for way too long. I can understand the mindset that causes this behavior, it’s one of two things or a combination of both; “Well the fish aren’t biting right now, so my baits fine” or trying to conserve on bait because it’s expensive. The end result is the same,you’re not as likely to catch sturgeon on old milked out bait, as you are on fresh bait, or fresh out of the package bait.

anchovies for sturgeon bait

Three things make sturgeon bait fish well; guts , blood, and slime coat.  If the guts are missing from your sand shrimp or smelt/anchovy then the majority of its sturgeon attracting ability is gone. The same thing goes for the blood, a huge amount of the blood is in the guts and gills, when the blood is gone then the bait isn’t bait anymore it’s just a little fish on your hook.

The third thing really only applies to smelt and anchovies, and this is the slime coat. The slime coat is the outer protective coating that each fishes skin and scales are covered with.  This slime coat is their first line of defense against infection from parasites and other nasty things that want to hurt them. When we smell a fish after touching or being close to it, it’s the slime coat that we smell, it’s this same slime coat that allows other fish to smell it when it’s used as bait.  When the slime coat is gone, the bait doesn’t feel slimy anymore; it just feels like wet bait. Freezer burnt sturgeon bait and bait that has been soaked too long on the end of the line have both lost their slime coat, and should be changed out.

Don’t be this guy, “My bait looks just fine, I don’t need to change it.”  I hear this all the time from my customers, many of whom have their own boat and are avid fishermen, and every time I smile and say “It’s not how it looks, it’s how it smells.”  At least half of the sturgeon baits fish catching ability lies in the way it smells, and for you salmon fisherman out there, the herring’s flash and vibration attracts the fish but it is the smell of freshly baited herring that seals the deal.
Again don’t be that guy, change your bait often! Change your bait twice as often as you think you should, and if you want to catch even more fish then change your bait three times as often as you think you should!  This is super effective and it’s not a secret, it’s just work, and yes, extra bait money.


3. Move around.

Sturgeon fishing on anchor is not the same as salmon fishing on anchor. The old adage of “Well they have to come through here sooner or later”, which is often applied to salmon fishing, simply does not hold true with sturgeon. If you’re not catching sturgeon for at least 45 minutes, then you need to move. Don’t sit there with all the other boats that are around you, (who are also not catching anything) and announce that “well the sturgeon must just not be biting”.  Wrong.  The sturgeon are biting somewhere, and they are biting for somebody, make that somebody you.

Sturgeon Fishing

Moving to different spots looking for sturgeon was the key to success this day!

Even if you don’t know where to move to, still get up and move.  Anything is better than staying where the sturgeon aren’t, at a minimum you will learn some new locations or be able to eliminate some locations.

4. Sturgeon hooks and leader.


Anodized (black, red, blue) hooks stay sharp longer than hooks that are bronzed or are just straight nickel.  The anodizing process adds a few more layers of protection to the base metal and keeps the hook’s point from wearing down as quickly.  Using anodized hooks is especially beneficial for sturgeon fishing in saltwater, where the saltwater has the tendency to just eat up standard nickel hooks.

Red hooks stay sharp the longest, but they don’t stay red, the red gets worn away and you see a goldish silver plating. Black hooks work almost as well as red hooks and they retain their black coloring.  Personally I prefer black hooks over red hooks when sturgeon fishing.

Sturgeon leader material doesn’t have to be Dacron. Dacron has long been the de facto standard for sturgeon leaders, the only problem with Dacron besides being moderately expensive, is it just doesn’t last.  Dacron has a tendency to fray under normal use, and has a strong tendency to fray when rubbing up against the head of a large sturgeon. In the last year I have switched from Dacron leaders to leaders made from braided line such as Tuff Line, Power Pro, or Sufix.  I only use 120 to 130 pound braided line. After switching to nothing but braid for my sturgeon leaders, I have found that these leaders outlast the hooks, which is a new problem, typically the Dacron would get fuzzy and require a whole new set up to be tied long before the sturgeon hooks ever got dull.

5. Use a light tipped rod for sturgeon fishing.

Sturgeon can be very light biters, and if they’ve been pressured hard then they know that the  resistance they feel when they pull on the bait means they’re in for a quick ride to the surface. You don’t want sturgeon to feel resistance when they are biting the bait. Using a really stiff rod hinders you in two ways, it keeps you from seeing the light bites, and it makes the sturgeon spit out your bait because they feel the rod.

Sturgeon fishing in some areas such as the Columbia below Bonneville Dam require a heavy sturgeon rod, but a heavy rod doesn’t have to have a really stiff tip.  If you’re going to fish Bonneville, find a rod with lots of backbone but with a tip that has similar flexibility to your salmon rod. If you’re sturgeon fishing other areas such as the Willamette or the main stem Columbia then use your medium action salmon rod.

Just one quick note on being a good sportsman, these light tipped medium action rods can definitely land big 8, 9 and 10 foot sturgeon, but it’s extremely hard and very unfair to the sturgeon to try to do so while remaining on anchor in all but the slowest water current. There is a reason you have a buoy ball on your anchor line and it’s not just to help you pull in your anchor; throw the rope, drift out, fight that big sturgeon quickly, and then come back to your anchor. Getting these big sturgeon in as quickly as you can is what is best for the sturgeon’s health and best for the longevity of our sturgeon fishery.

When sturgeon fishing, some people don’t know how long they should fight big sturgeon,  a good time frame of should be less than 30 minutes anywhere outside of Bonneville. Bonneville sturgeon fishing requires heavy lead in deep fast-moving water and this can make landing those big sturgeon in 30 minutes much harder.  However it can definitely be done, my rule at Bonneville is to not fight a sturgeon over an hour. If you can’t pressure a sturgeon hard enough to get him in an adequate amount of time then you need to hand the rod off to someone else and take turns fighting him.

Copyright 2013 Total Fisherman™

The author, Kevin Newell and his wife Lace DeWeert are professional sturgeon fishing guides in Oregon and Washington!

Click here to go fishing with the Total Fisherman Team